Serve a Static Website as a Unikernel

Unikernels are specialized, single-purpose operating systems that package your application with only the minimal OS components it needs to run. Think of them as extremely lightweight VMs that boot in milliseconds and use a fraction of traditional server resources.
Rump Kernels take a unique approach: they let you extract specific drivers and components from existing operating systems (like NetBSD) and run them in userspace or as unikernels. This means you can use proven, mature OS components without the overhead of a full operating system. Your application gets direct access to high-performance networking, file systems, and other kernel services while maintaining strong isolation.
The result is applications that start faster, use less memory, have smaller attack surfaces, and can be deployed more efficiently than traditional containerized or VM-based approaches.
You'll learn how to use the Rumprun toolchain to build a unikernel that hosts your static website served by Nginx. This tutorial focuses on giving application and web developers practical steps to get running with Rump Kernel-based unikernels.
This assumes you're on a GNU/Linux or BSD system and familiar with command line basics.
What We'll Build
We'll create a complete unikernel-based web server by:
- Setting up the Rumprun toolchain for building Rump Kernels
- Compiling Nginx to run as a unikernel on QEMU
- Configuring networking so you can access your site
- Adding your static content to the unikernel
- Setting up HTTPS support
This is experimental technology, so some troubleshooting may be required. We'll explain the tools in enough detail that you can debug issues if they arise.
1. Setting Up Rumprun
The Rumprun repository provides everything needed to develop unikernels based on Rump Kernel: debugging scripts, compiler tools, and NetBSD drivers as dependencies.
First, download the repository and its dependencies:
git clone https://github.com/rumpkernel/rumprun
cd rumprun
git submodule update --init
You'll need GCC installed (Rumprun doesn't yet support Clang). The exact package varies by distribution.
Choose your target platform. We'll use "hw" (hardware) rather than "xen" because it's easier to get started with. Even though we're building for hardware, we can test using virtual machines.
Build the toolchain:
./build-rr.sh hw
If this fails, you may need to install binutils on your system.
This compilation takes time as you're building both C and C++ components. When complete (it will say "build-rr ran successfully"), add the tools to your PATH:
export PATH=${PATH}:$(pwd)/rumprun/bin
Note: This PATH assignment is temporary. You'll lose it when you close the terminal or open new windows.
2. Building Nginx as a Unikernel
Now we'll build a Nginx unikernel using an existing Rump package:
git clone https://github.com/rumpkernel/rumprun-packages
cd rumprun-packages/
Configure the package builder to use your Rumprun toolchain. Copy the configuration template and update it:
cp config.mk.dist config.mk
Edit config.mk and set:
RUMPRUN_TOOLCHAIN_TUPLE=x86_64-rumprun-netbsd
(Don't add -gcc or other suffixes)
Now build Nginx:
cd nginx
make
You'll need genisoimage installed (often in a package called cdrkit) to build ISO files for bare metal deployment.
After the build completes, "bake" the unikernel. First, see available platforms:
rumprun-bake list
Use hw_virtio for cloud deployment. Bake your unikernel:
rumprun-bake hw_virtio ./nginx.bin bin/nginx
Test the basic functionality:
rumprun qemu -M 128 -i \
    -b images/data.iso,/data \
    -- nginx.bin -c /data/conf/nginx.conf
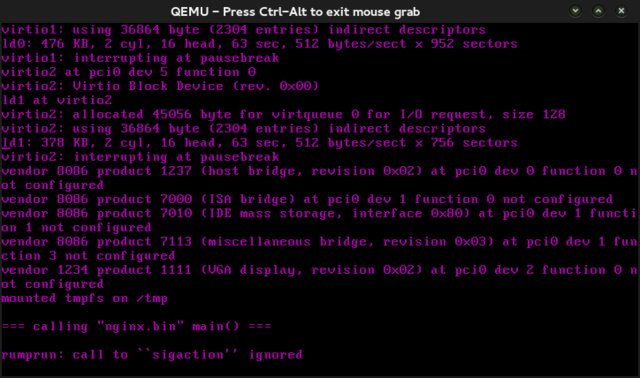
You should see QEMU launch with debugging text. Success means no "panic" messages (though "rumprun: call to sigaction ignored" is normal). Rump Kernel has a different understanding of signals than you would expect on an operating system.
3. Setting Up Network Access
To access your web server, we'll create a TAP network device. This provides more flexibility than simple port forwarding for complex applications.
Create and configure the TAP device (may require sudo):
ip tuntap add tap0 mode tap
ip addr add 10.0.120.100/24 dev tap0
ip link set dev tap0 up
Choose a network range that doesn't conflict with your existing network. Verify the device works:
ping 10.0.120.100
Now launch Nginx with network access:
rumprun qemu -i -M 128 \
    -I if,vioif,'-net tap,script=no,ifname=tap0'\
    -W if,inet,static,10.0.120.101/24 \
    -b images/data.iso,/data \
    -- ./nginx.bin -c /data/conf/nginx.conf
This command:
- Runs QEMU as the emulator
- (
-i) Attaches guest console on startup - (
-M) Sets memory limit to 128MB - (
-I) Creates guest network interface with iftag - (
-W) Configures VM network address (different from TAP interface) - (
-b) Mounts data.iso as block device on/data - (
--) Starts nginx with specified config
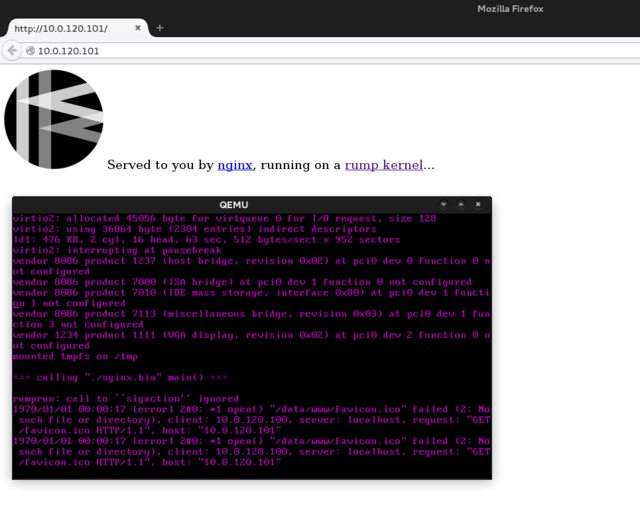
If successful, you can visit http://10.0.120.101 in your browser to see the default page.
4. Adding Your Static Content
Your website files go in ./images/data/www and Nginx configuration in ./images/data/conf. Simply replace the www directory contents with your static site.
For static site generation, consider tools like Jekyll, Hugo, or Sculpin.
To see new content:
- Stop the running unikernel
- Rerun
makein the nginx directory - Re-bake with
rumprun-bake - Launch with
rumprun qemu
Important: Don't modify the filesystem image while the guest is running. Use different image names when building new versions.
If you have connection issues, verify your tap0 device hasn't lost its IP address or gone down when you killed the emulator.
5. Adding HTTPS Support
Configure SSL in your nginx.conf under the server { section:
listen 443 ssl;
listen [::]:443 ssl;
ssl_certificate /data/conf/ssl-cert.crt;
ssl_certificate_key /data/conf/ssl-cert.key;
Generate a self-signed certificate or use your production certificates. Place the certificate files in the conf directory.
After updating the configuration:
- Remove build artifacts in
./build/ - Run
make - Re-bake with
rumprun-bake - Launch with
rumprun qemu
Your site will now be available over HTTPS.
6. What You've Accomplished
You now have the fundamentals to host unikernel applications based on Rump Kernel. This approach offers several advantages:
- Fast scaling: Unikernels boot in milliseconds, enabling rapid scale-up and scale-down
- Resource efficiency: Minimal memory and CPU overhead compared to traditional VMs
- Security: Reduced attack surface with only necessary OS components
- Deployment flexibility: Can run on cloud hypervisors or directly on hardware
You can build on these basics to create more interactive applications, run PHP applications in immutable images, or deploy applications directly on hardware without a traditional operating system.
Resources
I previously wrote a blog post explaining how to host Symfony 2 PHP applications on a Rump Kernel, but I've lost the original content. If anyone has a copy or link to this post, please send it my way! It covered more advanced topics around running dynamic web applications as unikernels.